How to Migrate Exchange 2013 to 2019: Real-World Walkthrough


If you’re still running on Exchange Server 2013, it’s time to move on. Microsoft ended mainstream support in April 2018, and extended support ended in April 2023. For securing the mail flow and optimising performance, my organisation needs to migrate Exchange 2013 to 2019.
In this guide, I’ll walk you through how I migrated Exchange 2013 to Exchange 2019 in minimal time. Let’s explore!
Pre-Migration Requirements for Exchange 2013 to 2019 Migration
Before diving into the transition, some pre migration steps we have to follow:
#Active Directory & Forest Prep
- Active Directory Functional Level: At least Windows Server 2012 R2
- Exchange 2013 CU Level: Exchange 2013 must be updated to CU21 or later
- Schema Master: Installed on a domain controller running Windows Server 2012 R2 or higher
#Hardware & OS Compatibility
- Exchange 2019 only runs on Windows Server 2019/2022
- I used Windows Server 2019 Standard Edition
- Installed all the latest Windows updates
#SSL Certificate Planning
I made sure to reissue and assign SAN certificates to support both Exchange 2013 and Exchange 2019 coexistence.
Related article: Exchange Server 2016 and 2019 End of Life
How to Migrate Exchange 2013 to 2019 – Steps I Followed
When my organisation decided on an Exchange 2013 to 2019 migration, as an admin, I had to transfer all the data with zero downtime. Fortunately, I found two solutions to move all the mailboxes and other content simultaneously, which are:
Method 1. Cutover Migration in Coexistence Mode (Manual Method)
This is a manual method and is recommended for small or mid-size organisations’ data. As I used this solution, my procedure stops in between the migration, which is quite frustrating. The result, I have to start the entire transition again. So, be careful, if option for this, and backup your data before beginning the process.
Here are the steps to migrate Exchange 2013 to 2019 effortlessly:
Step 1. Install Exchange 2019 in Coexistence
For Exchange 2013 to 2019 migration, first, you have to install Exchange 2019 on a new server, as you cannot do an in-place upgrade. For the same, prepared the schema using:
![]()
- Prepared AD:

- Installed Exchange 2019 through the GUI installer
During installation, I selected the Mailbox role, since the Edge Transport role is typically deployed on perimeter networks.
Step 2. Configure Exchange 2019 Virtual Directories
This was crucial to migrate Exchange 2013 to 2019 smoothly.
I configured:
- Outlook Anywhere
- Autodiscover
- OWA
- ECP
Using PowerShell:

Step 3. Move Service URLs to Exchange 2019
To ensure clients start connecting to Exchange 2019, I updated:
- Autodiscover DNS
- Load Balancer VIPs
- SMTP connectors
I used the following PowerShell command:
![]()
Then, I tested everything using the Microsoft Remote Connectivity Analyser.
Step 4. Test Mail Flow & Outlook Connectivity
Before proceeding with the entire Exchange 2013 to 2019 migration, I sent test emails from Exchange 2019 and ensured:
- SMTP routing was functional
- Mailbox access via Outlook and OWA worked
- Hybrid functionality (if applicable) wasn’t broken
Step 5. Migrate Mailboxes
Now came the main task, migrating mailboxes from Exchange 2013 to Exchange 2019.
I used the EAC (Exchange Admin Center):
- Go to Recipients > Migration
- Select + > Move to a different database
- Choose mailboxes and assign them to the Exchange 2019 mailbox database
Or use PowerShell to migrate Exchange 2013 to 2019 simultaneously:
![]()
I monitored the move status using:
![]()
Step 6. Reconfigure Receive and Send Connectors
After mailbox migration, I re-created all Send Connectors and Receive Connectors on the new server and removed them from Exchange 2013 once I confirmed smooth mail flow.
Step 7. Decommission Exchange 2013
Once I completed with Exchange 2013 to 2019 migration:
- All mailboxes
- Public folders
- Arbitration mailboxes
- SMTP connectors
- Services
I ran the uninstaller for Exchange 2013 from Control Panel > Programs and Features.
But before that, I ran:
![]()
And verified that no mailboxes were left behind:
![]()
Method 2. Automated Exchange 2013 to 2019 Migration (No Downtime)
If you’re dealing with a large number of mailboxes, the manual method is not practical. That’s where I recommend using the SysTools Exchange Migration Tool to migrate Exchange 2013 to 2019 efficiently. You can try this solution for free and gain all these benefits:
- No Downtime
- Bulk Data Migration
- Supports Large Mailbox Moves
- Migrate Exchange 2010 to 2019 directly
- The incremental migration option moves only new or modified items.
- Detailed Logs & Reports to track each step of the migration
- 24/7 Support
- Category-based filter for specific data migration
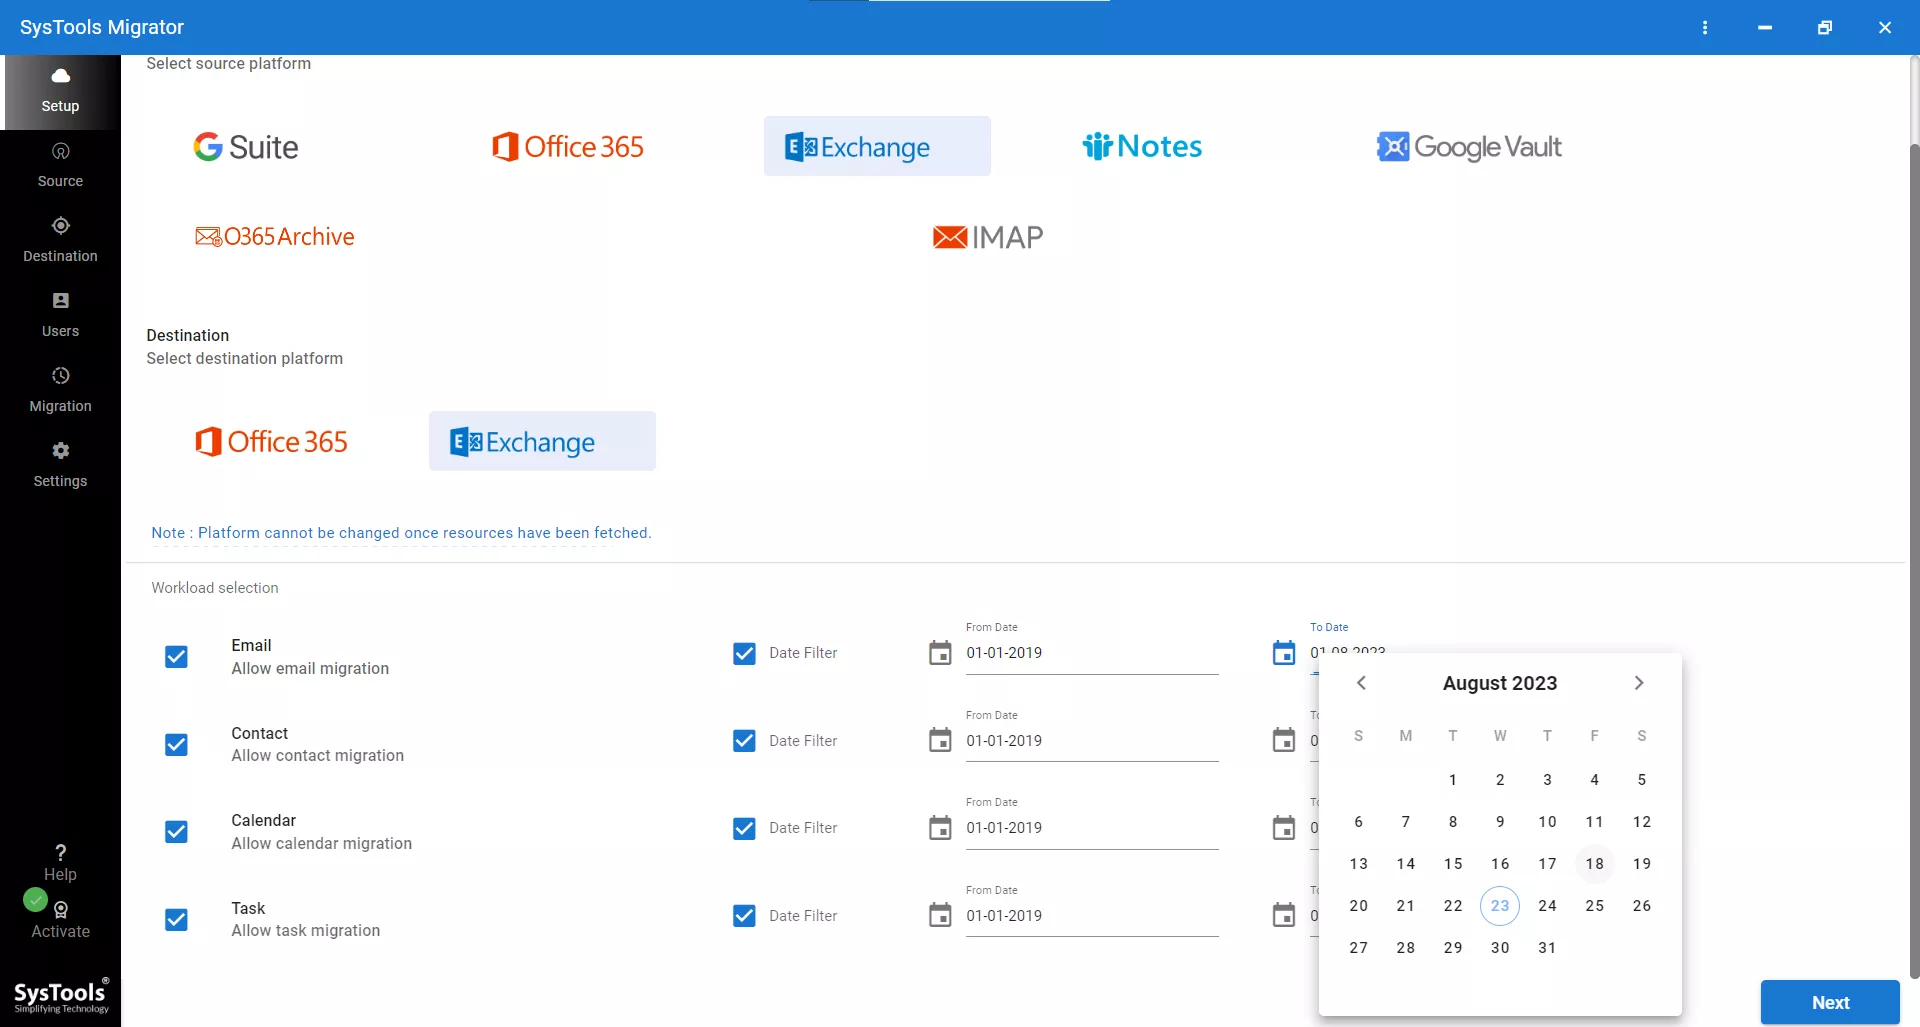
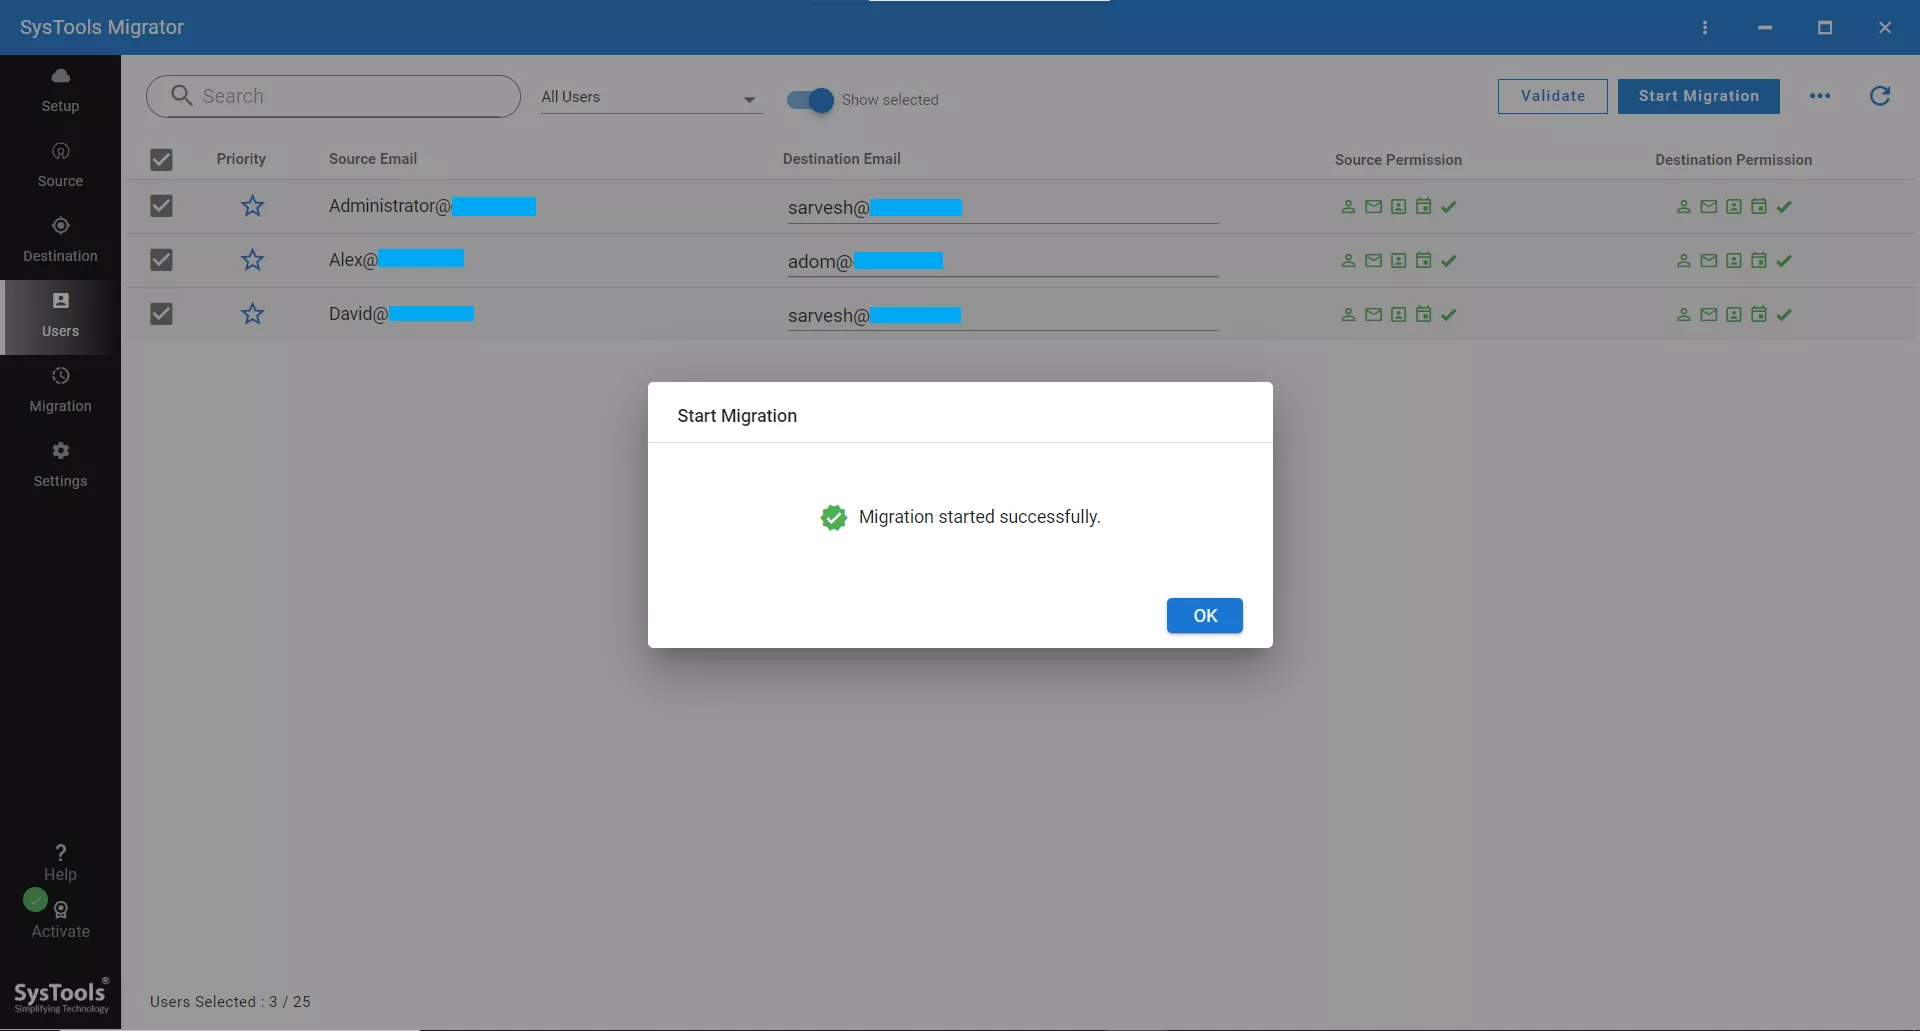
Steps to Migrate Exchange 2013 to 2019
Here are the quick steps of this solution:
- Step 1. Select Exchange as both the source & target platform.
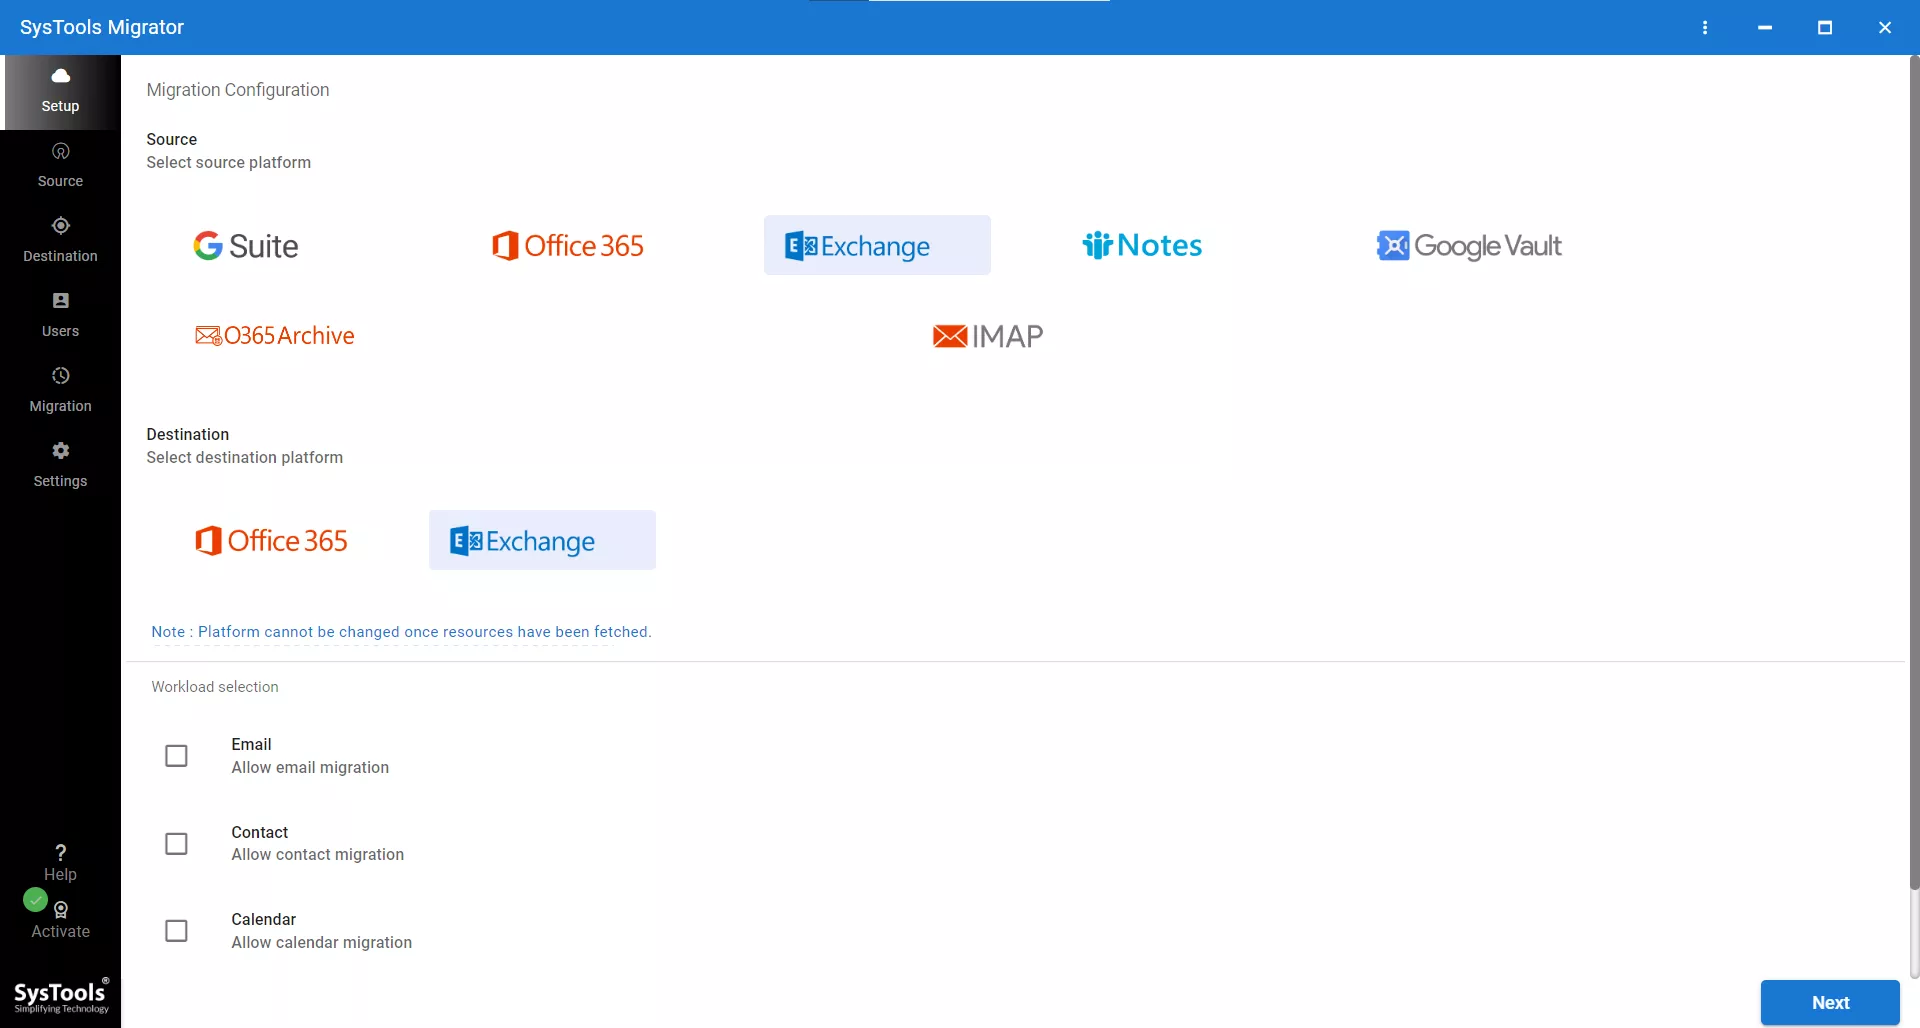
- Step 2. Choose data categories to migrate, and apply the Date filter option (if needed).
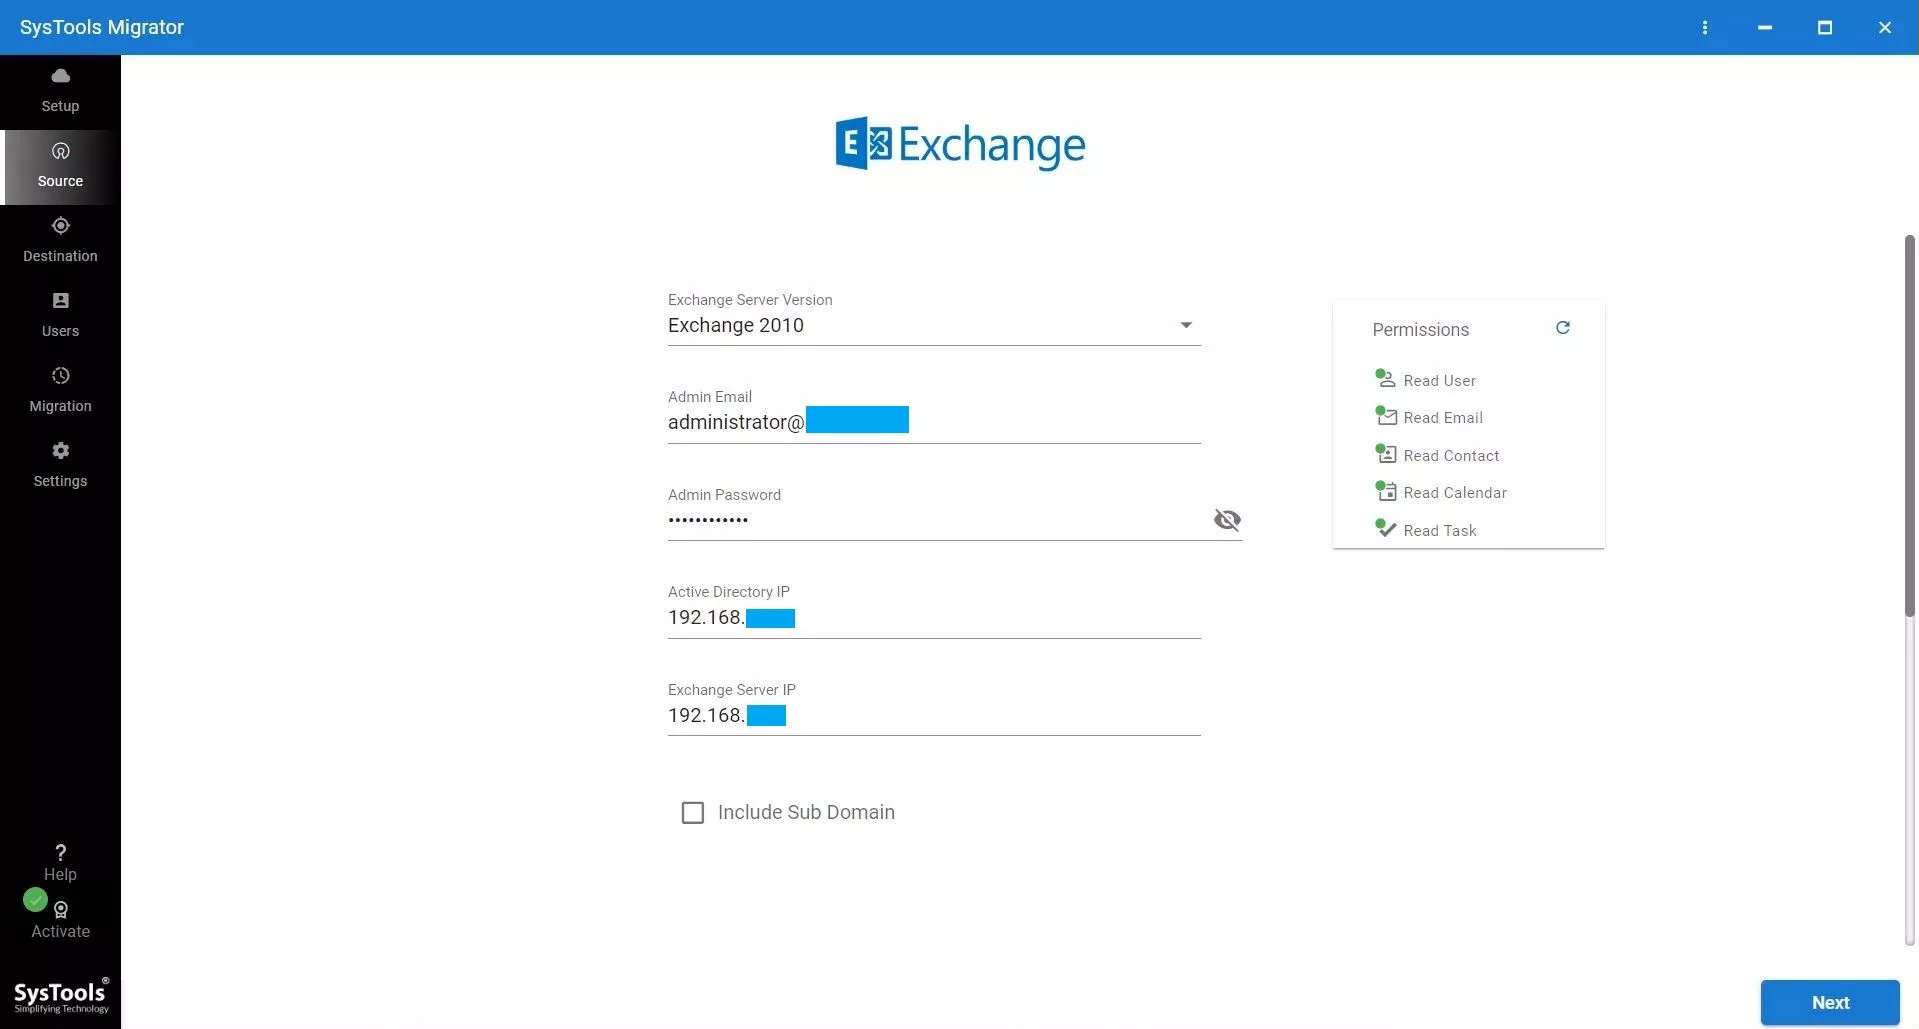
- Step 3. Select the Exchange version for both the source and the destination. Plus, provide Admin credentials, i.e. Admin Email, Admin Password, Active Directory IP, Exchange Server IP, and Include Sub Domain.
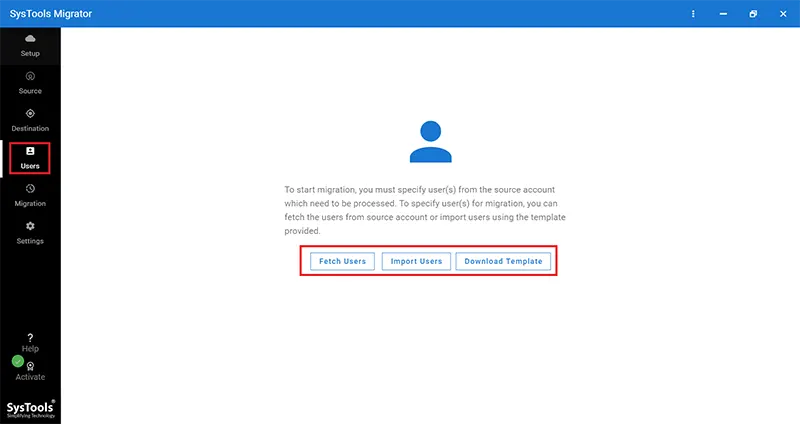
- Step 4. Now, map the users via Fetch Users, Import Users, or Download Template.
- Step 5. After validating all the permissions, hit the Start Migration button to migrate Exchange 2013 to 2019.
Post-Migration Security & Cleanup
After the Exchange 2013 to 2019 migration, I:
- Removed old Exchange 2013 certificates
- Verified that no MX records were pointing to the old server
- Removed any remaining connectors tied to 2013
- Patched the Exchange 2019 server again
Author’s Verdict
Migrating Exchange 2013 to 2019 feel daunting, but once I broke it down into manageable phases, the process became smooth. I hope, after reading these instructions, you can migrate Exchange 2013 to 2019 easily with zero downtime.
Still, if you’re looking for a smoother approach, the mentioned automated utility will help, especially when moving thousands of mailboxes. Additionally, one more thing that Microsoft officially announced is that Exchange 2019 end of life is near(Oct 14 2025), so it is suggested to migrate Exchange 2010, 2013, 2016, and 2019 to Office 365 for better collaboration and boost productivity.
People Also Ask
Q1. What is the Exchange 2019 licensing model?
Exchange 2019 requires a Windows Server license + Client Access Licenses (CALs). Standard and Enterprise editions are available.
Q2. How long does the Exchange 2013 to 2019 migration take?
It depends on mailbox size and network speed. In my case, migrating 300 mailboxes (25 GB avg) took about 3 days, including testing.
Q3. Can I upgrade Exchange 2013 to 2016 or 19 directly?
No, Exchange 2013 and 2016 cannot coexist directly. You must first install Exchange 2019 on a new server and migrate.