Microsoft Teams Migration Checklist: A Practical Guide


When I need to migrate my projects, I never go straight to the execution. The first thing that I do is prepare a well-organized Microsoft Teams migration checklist. So that nothing gets left behind. I have learned that transferring Microsoft Teams data needs a pre-planned preparation and the requirement of the right tools to make everything go seamlessly.
In this guide, I will walk through my personal checklist that I follow for Microsoft Teams migration. I am going to explain it in simple language so you can use it in your organisation.
Why a Microsoft Teams Migration Checklist Is Important
Before I start with the migration, one thing that clicks is What could go wrong? At this point the checklist becomes important. Here are the reasons why it is important:
- It minimizes the risk of data loss
- Make sure that the accuracy stays correct while mapping users
- Channel structure and permissions stay intact
- Less time-consuming
- Ensure that the SharePoint and OneDrive stay connected and in sync
Without a checklist, migration is like a guess that can go either wrong or right. But if you have a checklist the whole process becomes manageable and more predictable. Now it’s time to explore each phase that I personally follow.
Phase 1: Pre-Migration Assessment
The first thing that I do in the Microsoft Teams migration checklist is carefully review and check the current environment.
#Identify the migration scope
It clears the confusion:
- Which team do you prefer to move to a new setup
- Which channel is required more private or shared
- If chat history is required for the migration
- From which data range should the data need to move
Every case requires a different approach to start with.
#Audit the source environment
- How many teams are there?
- Number of channels
- Counting the number of users and guest users
- Storage space that is required
- Aligned apps
These audits are important as they give a clear picture of the scope.
#Check dependencies
Most of the team relies on:
- SharePoint for channel files
- OneDrive for private chat files
- Exchange online for calendar and mailboxes
Avoiding these dependencies can hamper workflow by breaking the collaboration.
Related Article: How to Join Microsoft Teams Meeting
Phase 2: Planning and Strategy
After checking the environment, the next thing to do is planning. Proper planning can make a huge difference in the migration.
#Define migration goals
- Which data is the priority for the migration
- If there is anything that needs to be archived
- What should be excluded from the migration
By following these key points you can avoid the unwanted data and minimize the complications
#User mapping
- It is important to check if the users from the old system are correctly matched with the users in the new system
- Guest accounts need to be checked properly so that they can be managed and moved correctly
- Exclude all the disabled accounts from the migration
A good Microsoft Teams migration checklist always has user mapping validation before the process begins.
#Permission planning
- Team owners
- Members
- Channel-level permissions
- Access of private channel
Losing permission can lead to confusion and security risks
#Communication plan
Always notify the stakeholder about:
- The time that is going to take
- Downtime
- What changes should they expect
Clear communication is the key to avoiding confusion
Also Read: How to Download Microsoft Teams Recording
Phase 3: Pilot Migration
I always suggest to every user to go with the pilot migration instead of migrating everything in one go.
Why choose Pilot migration
It helps users in:
- Checking how everything is working
- Ensure that the user permissions are set correctly
- It confirms that no files and chats are missing
- Identify if there are any unexpected problems or errors
I always go with a small group of users or a single team and start the process of migration.
This stage filters the Microsoft Teams migration checklist because when you actually test things to will find small gaps that may get avoided during planning.
Phase 4: Choosing the Right Migration Method
Here are the available methods:
#Manual Migration
- Setting up Teams again manually from the start
- Importing the files locally on the desktop and then exporting them
- Trying to copy chats and conversations and then pasting them
I can say that it is not a practical method and personally I don’t prefer this method.
#PowerShell-based Migration
- It helps the user with team creation
- Setting up basic configuration
- User assignment
This method is not recommended for migrating chat history and complex structures.
#Using a Professional Tool
The SysTools Microsoft Teams Migration Tool is specially designed for businesses and enterprises that need to migrate Microsoft Teams environments. Instead of depending on scripts or manual processes, the MS Teams Migration tool offers administrators the privilege to run and track the migration process while taking everything under control.
One of the biggest advantages that comes with this Teams migrator is that it can migrate entire Teams environments while keeping the original hierarchy and data integrity intact. Most of the time organizations faces issue while preserving conversations and user permissions during migration. This Microsoft Teams Migration software makes sure that each and every component of Teams data is transferred accurately and nothing is left behind in the destination tenant. Now, let’s briefly understand each feature that It offers.
Comprehensive Teams Data Migration
One of the strongest parts of this Teams Migration Software is its comprehensive migration capability. It helps administrators in moving the entire Teams workspace, including all related content and the collaboration part. The software helps in the migration of:
- Microsoft Teams with all the channels
- Chats and posts that are shared inside channels
- Discussions that happened in private or shared channels
- One-on-one chats and group conversations
- Files and documents that were stored in Teams channels
- Guest access permissions and user memberships
- Mentions, emojis, and images that were used in memberships
- Links, stickers, and all the shared stream content
- Messages that were marked as important
During migration, the SysTools Microsoft Teams Migration Tool keeps the original folder hierarchy and metadata intact, making sure that all files and chats appear in the destination environment exactly. This is very useful for enterprises where maintaining communication history is important for compliance and auditing.
Another brilliant feature is that administrators are able to move Microsoft Teams chats from one user to another. This has become an important part when an employee leaves the organization or when there is a need to merge multiple accounts into one.
Bulk Teams and Channels Migration
It is seen that large organizations manage dozens or even hundreds of Teams. Migrating these manually is a near-impossible and time-consuming task. The Teams Migration Software solves this problem by offering bulk migration of Teams data. Once the administrator logs in to the Office 365 administrator account the tool automatically grabs the list of users, Teams and even Office 365 groups.
Administrators are able to select multiple Teams and initiate migration in a single batch process. This batch migration capability minimizes admin effort and ensures that the data gets transferred swiftly without any errors. Here are some points that this Teams Migrator offers during migration:
- All channels are migrated as Standard Channels.
- Once the migration is done all the members can access all the channels in the new destination of Teams.
Source and Destination Mapping
In order to get an accurate migration, the Microsoft Teams Migration Tool offers an advanced mapping feature that connects the source and destination environments. Once both the tenants are authenticated:
- Source Teams with destination Teams
- Source users with destination users
- Groups between different tenants
For any reason if the destination Team does not already exist, the tool offers administrators the ability to create a new Team directly within the mapping interface. This feature helps in simplifying the migration process and helps in preventing data from being transferred to unidentified locations.
Mapping is very important when it comes to enterprise migrations because it makes sure that every conversation and permission is connected correctly in the target environment.
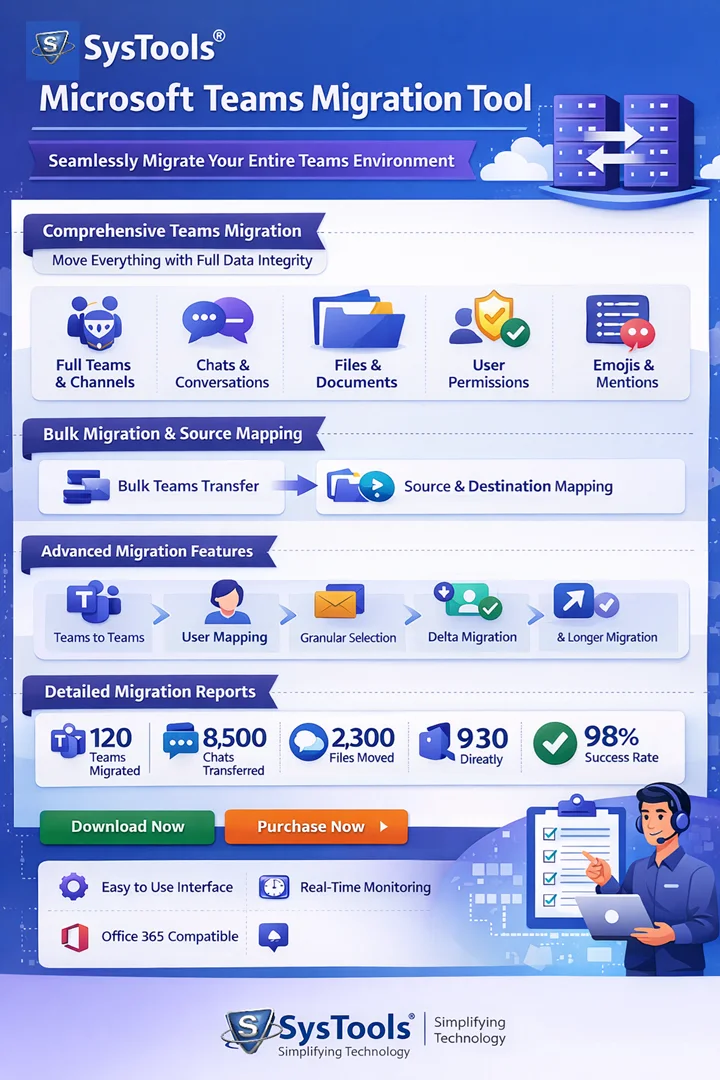
Detailed Migration Reports
Monitoring and reporting are key parts of any migration procedure. The MS Teams Migration tool gives the privilege of real-time migration status and comprehensive reporting. During migration, administrators are able to view the details such as:
- Number of channels that have been migrated
- Total number of messages that have been successfully transferred
- Files and documents are processed during the process of migration
- The overall progress of the migration
After the migration, the Teams Migrator created both summary and detailed reports. These reports have the details of:
- Team names
- Channel numbers
- Message count
- Group details
- File migration details
- Total time taken for migration
These reports notify the IT teams that the migration has been completed. Also these documents help as a record for compliance and auditing in the future.
Advanced Migration Capabilities
The Teams Migration Software is designed with advanced migration capabilities that help organizations to handle complicated migrations smoothly.
Teams-to-Teams Migration: It helps the user to transfer entire Teams workspaces, that includes members, permissions, etc directly from the source tenant to the destination tenant.
Channel Migration: It helps in the migration of channels along with their files, chats, and settings while the original structure remain same.
User Mapping: The Microsoft Teams Migration Tool supports user mapping to make sure that chat history and permissions remain connected to the respective users in the destination tenant.
Tenants to Tenants migration: It helps to migrate chat, channels, post, and other Microsoft Teams data from one tenant to another.
Granular and Selective Migration Options
Not every organization considers migrating all its Microsoft Teams data. Sometimes they only want to move certain departments and projects. That’s the reason this MS Teams Migration tool offers granular migration options. With these features, administrators are able to:
- Choose the Teams that they want to migrate
- Select specific individual channels
- Move the data of selected users
This Teams Migrator includes date filter options. This helps organizations to migrate content within a specific time range which automatically reduces the migration time and storage.
Re-Run Migration Features
One of the most useful features of the tool is its Re-Run Migration capability. It makes sure that the migration gets completed smoothly even if there is any issue during the process. It offers three re-run modes:
Retry Failed Items: This feature helps in migrating those items that failed during the first migration attempt.
Re-Run Full Migration: This mode helps the users by running the migration process again and makes sure that any item that was left behind gets migrated successfully.
Delta Migration: Delta migration only migrates the new or updated data that was added after the initial migration. This is very helpful in staged migrations data keeps changing while the process is in progress.
User-Friendly Interface
One more advantage of the Teams Migration Software is its simple interface. Even though Teams migration can be technically complex, this tool is designed to make the process simple for administrators. It offers the admins to complete migrations without dealing with technical challenges. Here are some key features:
- Simple dashboard-based navigation that makes the tool easy to use for beginners as well
- A step-by-step migration process that helps you through each stage
- Option to select multiple Teams and channels in bulk to save time
- Quick and secure login using Office 365 credentials
- It helps to move Teams Post to another channel
This simple and user-friendly design helps in understanding the tool, so IT teams are able to learn how to use it and handle migrations more smoothly.
Office 365 Subscription Compatibility
The Microsoft Teams Migration Tool supports multiple Microsoft 365 and Office 365 subscription plans, which is suitable for organizations of different sizes. Supported plans include:
- Office 365 Enterprise plans like E1, E3, and E5
- Office 365 Business plans like Business Premium and Business Essentials
- Exchange Online Plans that are Plan 1 and Plan 2
- Office 365 Education Plans like A1, A3, and A5
- Office 365 F1 Frontline plan
Once the administrator signs in using the admin credentials for both sources and destination Office 365 accounts and grants the required Azure application permissions.
Technical Specifications
The SysTools Microsoft Teams Migration Tool is designed with strong, enterprise-level system requirements so it doesn’t face any difficulty while performing large migrations.
Software Details
- The version of the software is 7.7.0
- It’s Size: 177 MB
System Requirements
- RAM: Needs to be a minimum of 8 GB for a smooth performance
- Processor: A minimum 8-core processor is needed to handle the task smoothly
- Hard Disk Space: Approx 500 MB of space is needed for installation
- Make sure at least 20 GB of free space for data processing is available
Supported Operating Systems
- Windows Server 2016, 2019, 2022, 2025
- Windows 10 and Windows 11 (64-bit)
Prerequisites
- Microsoft .NET Framework 4.8 needs to be installed on your system
- Make sure that you are using the latest versions of Microsoft Visual C++ Redistributable.
- Office 365 Admin account with a valid license
- Azure application registration with API permissions enabled for proper connectivity
Phase 5: Execution Stage
When everything is checked, I start the full-scale migration.
#Freeze changes
Before migration:
- Communicate with the users to make any big changes during this time
- Put a restriction on creating a new Teams
- Secure important areas to prevent issues
#Run migration in batches
I divide the migration process:
- By department
- By priority
- By size
By following these points, the risk gets minimized. A well-structured Microsoft Teams migration checklist always includes a well-planned execution to avoid the system getting overloaded.
#Monitor logs and reports
I always monitor:
- Records of any kind of errors
- Items that are left behind
- If access permissions are mismatched
- Errors while transferring files
Steps that are taken to resolve the error during the migration help in avoiding post migration issues.
Phase 6: Post-Migration Validation
Validation plays a vital role and without this migration is not completed
#Data verification
I always verify these:
- How the teams are organised
- Old chat conversations
- If access is mismatched for files and documents
- Connected tabs and apps
#Permission testing
It is important to check:
- Log in and check if Teams is working
- Check all the shared files if they are opening
- Verify if private channels are working as they are
Including post-migration validation in the Microsoft Teams migration checklist ensures a seamless user experience.
Here are the steps that I follow:
Step 1: Download and install the solution on your system. Then select Office 365 for both source and destination.

Step 2: Select the required items from the Teams workload options. After that, check the Teams and channels box, and click Next to start the process to migrate Teams from one tenant to another

Step 3: Enter the Admin credentials of the source and destination tenant, after that click the Validate button to check and verify that the required permissions are correctly assigned to the members.

Step 4: Teams permissions will get validated automatically. Now click on the Next Button.

Step 5: Go to the Resource tab and click the User screen. You will see several options to add users from the source that you want to process.

Step 6: Hit the Start button

Common Mistakes to Avoid
These are the mistakes that I avoid before or during migration:
- Avoiding old chat conversations
- Not going with a small batch migration before full migration
- Ignoring whether user mapping is set correctly or not
- Forgetting to go through SharePoint connections and dependencies
- Rushing to process migration
Avoiding these mistakes is now a permanent part of my Microsoft Teams migration checklist ensures that there is nothing to miss anything like this again.
Author’s Verdict
Migrating Microsoft Teams is not about a technical shift. It can affect the user’s communication and workflow if not done with proper planning. A well-structured Microsoft Teams migration checklist keeps everything organised and reduces risks.
For a small migration you can consider a manual method but for a larger and enterprise move it is recommended to go with a professional solution that we have discussed above. I can confidently say that after using all the migration methods, using a professional solution like the SysTools MS Teams Migration Tool is the winner as the most efficient and reliable method. It simply removes the complications of manual migration and scripting while offering powerful features like large migration and delta migration.
FAQs
Q. Is it possible to migrate Microsoft Teams manually?
Yes, it is possible to do it manually but it is a time-consuming process and risky for large environments at the same time.
Q. How much time does a Teams migration take?
It all depends on factors like data size, number of users and migration method.
Q. Is it important to use a professional tool for Teams migration?
It is not important to use a tool for large-scale or complex migration because it makes the process safer and quicker.
Q. Is it possible to migrate guest users?
Yes, it is possible to migrate but the condition is to map them properly ot target tenant.
Q. What can be a risk in Teams migration?
There are many risks but the major ones are improper user mapping and missed dependencies, which can cause major issues.