How to Import MBOX to Google Workspace: Step By Step


If you have bulk MBOX files, containing thousands of emails, and are now looking for an easy way to import them into Google Workspace (formerly known as G Suite), you have come to the right page. In this article, I am going to explain the two most prominent methods you can use to successfully import MBOX to Google Workspace without any downtime.
Overview
MBOX (short form of mailbox) is a widely used file format for storing email messages locally. It consolidates multiple emails into a single plain text file and is supported by various popular email clients such as Thunderbird, Apple Mail, and Eudora.
Due to the vast email client compatibility of MBOX files, users and organizations often store bulk emails in MBOX files. MBOX files are also ideal for archiving, backing up, and migrating to other platforms such as Google Workspace.
But when it comes to migrating MBOX files to cloud platforms such as Google Workspace, there is no such direct tool or method. Organizations and IT administrators often find themselves struggling while moving their on-prem data to the cloud.
What are the Ways to Import MBOX to Google Workspace?
There are two ways that you can use to perform this task:
- Using Thunderbird Email Client (Can be technical & error-prone)
- Using an Automated Software (Easy to use & works flawlessly)
Let’s discuss them one by one in the coming sections.
Method 1. Moving MBOX Files to Google Workspace (G Suite) Via Thunderbird
Since there is no direct way offered by Google, we can use Thunderbird, a free and open-source email client. Using Thunderbird as an intermediary, you can import MBOX files to transfer emails via IMAP. However, this could be a long process as there are multiple steps that you need to take.
Note: Make sure to enable IMAP in Google Workspace. Check out the linked article for the same.
Step 1. Download, Install, and Set Up Thunderbird
- Navigate to https://www.thunderbird.net/en-US/download/ and download the latest version on your PC. Install and launch the software.
- Navigate to Tools > Account Settings > Account Actions > Add Mail Account.
- Enter destination Google Workspace account credentials and set up with IMAP protocol using the details below:
- Incoming server: imap.gmail.com
- Outgoing server: smtp.gmail.com
- IMAP Port: 993 (SSL/TLS enabled)
- SMTP Port: 465 (SSL/TLS enabled)
- Complete the authentication process.
Note: – If 2FA is enabled for the user account, then you need to use the app password.
Step 2. Install the ImportExportTools NG Add-on
- In Thunderbird, navigate to Add-on Manager.
- Search for ImportExportTools NG and install it.
- Once the add-on is installed, you have to restart Thunderbird to activate the add-on. It will help you import MBOX to Google Workspace.
Step 3. Import MBOX Files to Thunderbird
- Right-click on the Local Folders in Thunderbird.
- Click on ImportExportNG > Import mbox Files. Choose the required option from the drop-down and browse MBOX files.
- Once the import process is completed, you can find all the imported emails in the new folder under the local folder.
Step 4. Transfer Imported MBOX to Google Workspace
- Select the email or folders that you want to move from the imported MBOX Folder.
- Drag and drop these emails to the desired folders under your Google Workspace account in Thunderbird.
- Thunderbird will start syncing these emails to your Google Workspace account mailbox via IMAP.
By following the above four steps, you can easily import MBOX to Google Workspace. However, there are a few limitations as well.
Also Read: How to Migrate Zimbra to Office 365?
Shortcomings of the Manual Method
- It is evident from the above that the manual method involves multiple stages, lengthy and technical steps. That can be time-consuming, complex, and error-prone to import MBOX to Google Workspace.
- Since Thunderbird requires setting up each account, importing MBOX files into multiple Google Workspace accounts is not practical.
- The manual method does not offer any date filter option to migrate emails for a specific period.
- It requires end-user credentials to configure the Google Workspace account in Thunderbird.
- Since the entire manual method needs to be carried out by humans, there is are potential chance of human error that can lead to data loss.
Method 2. Importing MBOX to Google Workspace Via Automated Tool
To overcome all the limitations of the manual method, you can choose a reliable yet cost-effective software solution. For a faster, more reliable, and bulk-friendly solution, I would highly suggest the SysTools MBOX to Google Workspace Migration Tool.
When it comes to organizational data transfers, data security becomes paramount. Using this software allows you to directly import the .mbox files to Google Workspace accounts while maintaining data integrity and hierarchy.
Five Quick and Easy Steps to Import MBOX Files to Google Workspace
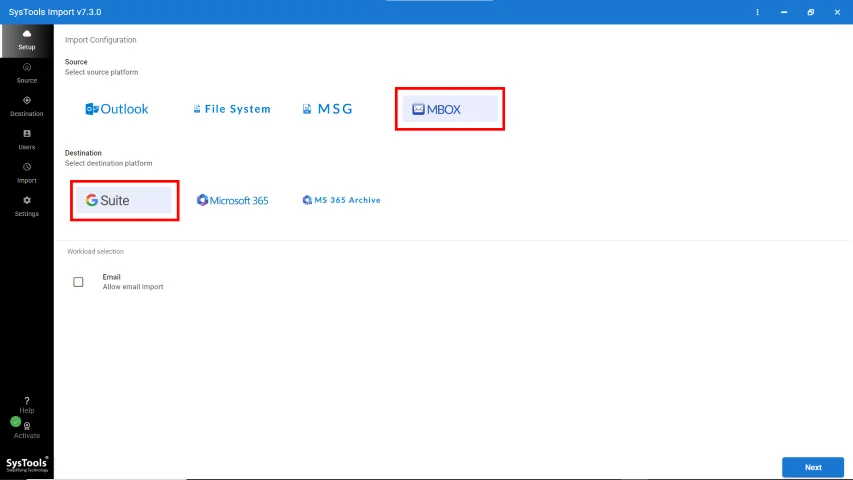
Step 1. After running the software, select MBOX as the source and G Suite as the destination. Enable Emails in the workload section and apply a date filter to import MBOX to Google Workspace selectively.
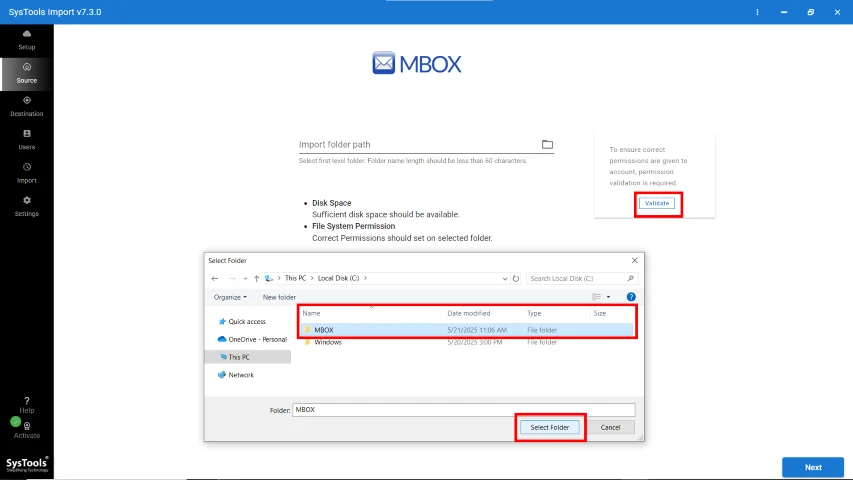
Step 2. Navigate to the source tab, add the MBOX file or folder path, and click on the validate button.
Step 3. Authenticate with destination G Suite admin credentials and validate permissions.
Step 4. If you have multiple MBOX files of various users, and you want to import them accordingly. Then you can use the user mapping option provided in the software. Use CSV mapping and add bulk users to import MBOX files to Google Workspace accounts.
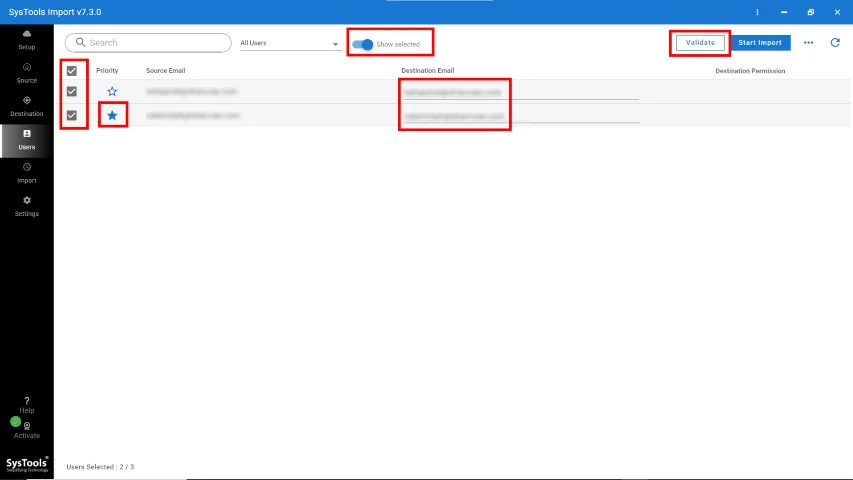
Step 5. Select the desired user accounts and click on the import button to import MBOX to Google Workspace.
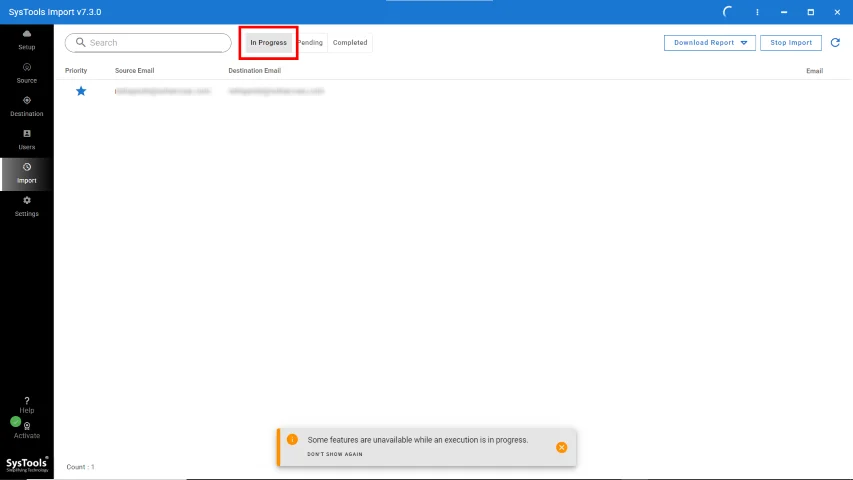
With these five steps, you can easily import multiple MOBX files into multiple Google Workspace accounts without any downtime or data loss. Additionally, you do not need to possess any technical knowledge; the simple GUI makes the software easy to operate even for naive users.
Also Read: How to Import MBOX to Office 365?
Wrapping Up
It can be a daunting and time-consuming task to import MBOX to Google Workspace, especially if you follow the traditional approach using Thunderbird. To streamline and automate the entire import process, this article outlines the correct method for importing .mbox files into G Suite.