How to Set Up Auto Reply in Outlook 365 – All You Need to Know


In this article, I am going to answer the user query, i.e., What is autoresponder and how to set up auto reply in Outlook 365? If you have a similar query or are looking for the same, then you have reached the right place. Go through the guide to know the accurate steps for setting up the auto reply feature in Office 365.
Nowadays, Outlook 365 is very popular and mostly used by organizations. In large organizations, every hour, on average, 10 emails are received per employee. Sometimes an employee is on leave and can’t tell everyone about their absence. In this case, he needs a mechanism where if he is not there in the office, he can notify incoming emails that he is not present but received the email and shortly acknowledge the message.
Outlook provides an inbuilt feature known as the autoresponder. Enabling this feature allows users to reply to emails automatically. A question can arise after this: How to Set Up an auto-reply in Office 365? and What is an autoresponder in Outlook?
When I email my colleagues, they instantly acknowledge the mail, even if they are on leave. Is there any way through which I can also do the same? If yes, then how?
—Nayanthara
What is Auto Reply (Autoresponder) in Outlook in Office 365?
In Outlook 365, an Autoresponder is also called an Auto-reply and out-of-office reply. However, this feature allows you to automatically send a template email response in reply to received mail.
This feature is useful when an employee is on leave or in a meeting where they can’t reply to emails. This feature also helps senders receive a time frame specifying when you can send the actual response.
Need for an Autoresponder in Outlook:
- Absence Notifications: When you need to inform people that you’re not available at the workplace for various reasons, such as during vacations or business trips.
- Timely response: When you need to automate the process of acknowledgment for received emails. For example, sending an acknowledgment reply that their message has been received.
- Customer Service: When you are required to provide quick responses to common inquiries or FAQs of consumers.
- Efficient Communication: You need to maintain communication standards even when you’re not actively checking your email.
What are the Benefits of Setting Up Autoresponder in Office 365?
- Autoresponders help to immediately acknowledge receipt of emails, assuring the sender that their message was received.
- Beneficial for responding outside of work hours, which helps in increasing client satisfaction.
- Sends the same message to all senders, ensuring that communication is consistent.
- Beneficial for maintaining a professional image by alerting senders about your availability or providing necessary information.
- It can handle a huge number of messages without requiring more human resources.
- Beneficial for automating routine inquiries, reducing the pressure on customer service or administrative workers.
- Notifies contacts when you are gone, allowing you to focus on other work without being concerned about missed conversations.
- Workload management reduces the cognitive load associated with managing and responding to repetitive or routine inquiries.
Steps to Set Up Auto-Reply in Outlook 365
There are multiple steps for different versions of Outlook. Follow these steps to enable AutoReply in Outlook. However, you know that there are different versions of Outlook, like Outlook for Windows, Outlook for Mac, and Outlook on the web.
Steps to Enable Autoresponder For Outlook For Windows (Outlook 365)
- Step 1. Log in to Outlook on your Windows and click on the File tab located on the top left.
- Step 2. Find the Automatic replies button in the navigation pane and click on that
- Step 3. Enable the Send Automatic Replies by clicking on the radio button
- Step 4. Select the timings of auto-reply, like when to start and when to stop.
- Step 5. Write an auto-reply body for My Organization that will notify emails received from the same domain. Otherwise, you can write it in Outside My Organization, which will send reply messages to everyone.
- Step 6. To save the automatic reply, click on the OK button. You have successfully learned what an autoresponder is in Outlook for Windows and how to enable it.
Note: If you didn’t select the time range for auto reply it will start immediately
Steps to Enable Auto-Reply For Outlook For Mac
- Step 1. Open the Outlook Application and click the Tools menu.
- Step 2. After that, click on the Automatic Replies menu item.
- Step 3. Now, enter your auto-reply message in Reply Once to Each Sender.
- Step 4. After that, check the checkbox named Send Automatic replies.
- Step 5. Enter the time range if you need it.
- Step 6. Click on OK.
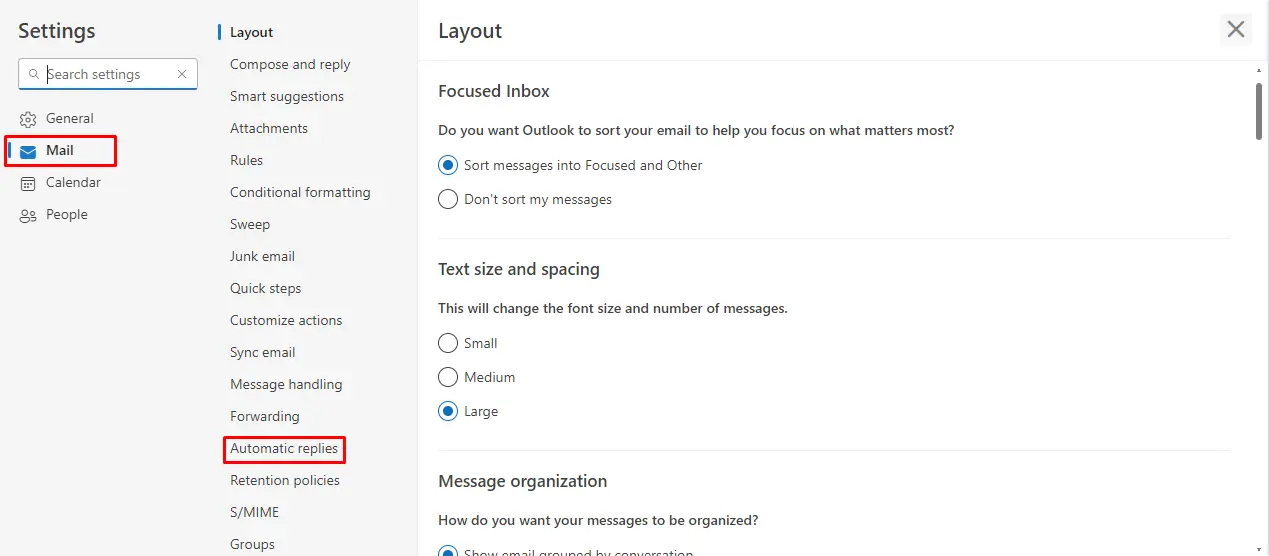
Steps to Set Up Auto-Reply for Outlook on the Web
Step 1. Log in to Outlook.com and go to settings in the top right.

Step 2. In settings, navigate to Mail settings and click on Automatic replies.
Step 3. Enable the automatic replies by sliding the enabled slider.
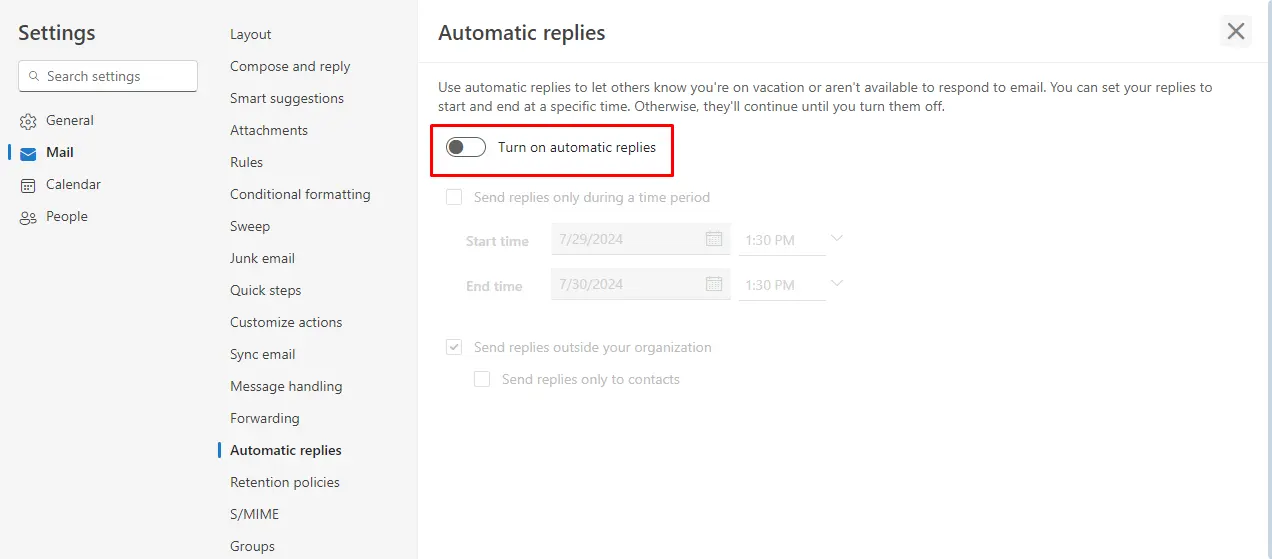
Step 4. You can set a time range for automatic replies according to your needs. Otherwise, write your message in the text box.
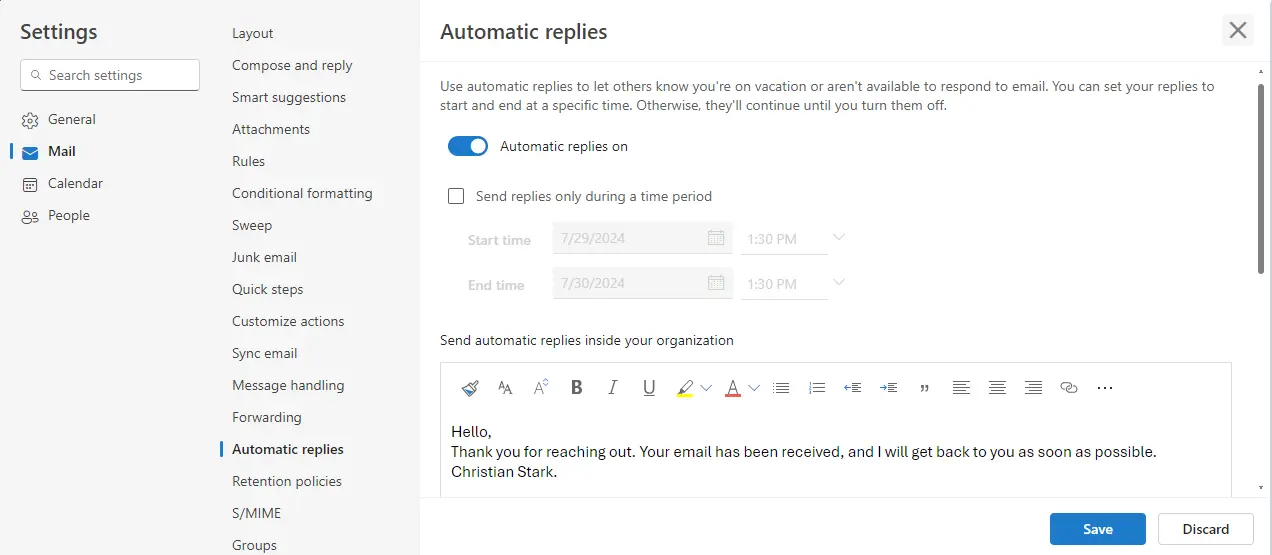
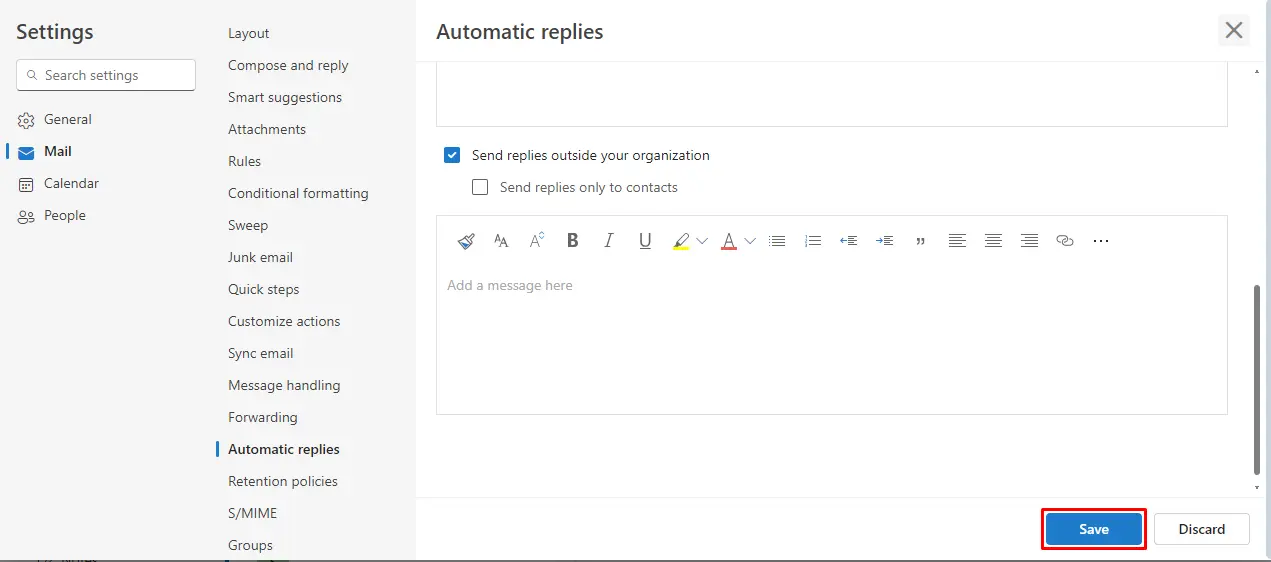
Step 5. Check the Send replies to outside your organization check box if you want to send replies to Everyone. Otherwise, check only contacts >> Click on OK and Save.
You have successfully learned what an autoresponder is in Outlook on the web and how to enable it.
Scenario-Based Query Related to Auto-Reply in Outlook
I have been using Autoresponder in Outlook.com for 2 years, and I don’t want to disable auto-reply. But due to that, my mailbox is full of auto-replies. What can I do in this situation?
—Steven
We understand the storage quota limit of only 50 GB, and upgrading can cost much to users and even more if there are 60 to 70 users. In that case, we advise you to export your Outlook.com Mailbox data to your local PC and restore it when you need. However, Outlook.com doesn’t provide any streamlined solution for exporting.
In this case, we suggest you use SysTools Outlook.com Backup Tool. This is an automated software to streamline the process of downloading Outlook.com data. This software features a date filter that can export data according to the timeline. Additionally, it also features a path selection option where you can select a location to save your Outlook data.
Conclusion
In this detailed guide, I have discussed a step-by-step approach on how to set up an auto reply in Outlook 365. Additionally, I have also mentioned the advantages of Autoresponders in Outlook and the working of Auto-Reply. Leverage this feature and make your mailbox management efficient and fulfilling.