Export Office 365 Mailbox to PST - Learn the Top 3 Ways
There are times when Office 365 admins and users are required to save their cloud data locally for various security and personal reasons which include legal, compliance, and self-archiving. Since there is no direct tool offered by Microsoft, hence in this detailed guide I am going to touch on the best possible ways to export mailboxes from Office 365 to PST file format. I am going to elaborate on different techniques such as eDiscovery, PowerShell, and the automated tool for exporting emails in PST files from Office 365.
Overview
For a user working in an organization, several emails are drafted and received throughout the day. These emails carry the most crucial data that needs to be extracted for official purposes. Therefore, it needs to be saved to a personal folder, which enables easy access to the data in case of poor internet supply or when the server connectivity is slow. For quick data export, you can use the software and the steps below.
5 Simple Steps to Export Office 365 Mailbox to PST
- Step 1. Download & Run Below Software on PC.
- Step 2. Opt Office 365 & PST as Source & Destination.
- Step 3. Enable Required Mail Items & Apply Date Filter.
- Step 4. Set Destination Location & Select User Account.
- Step 5. Validate Permissions & Click on the Start Button.
Exporting Mailboxes from Office 365 to PST File Using eDiscovery & PowerShell
There are two manual ways that you can utilize while exporting emails from Office 365 to PST file using eDiscovery export tool and PowerShell method. Let's understand a detailed step by step working of each way.
Method 1: Export PST from Office 365 Web Via eDiscovery Method
- Make sure you have Office 365 Admin account credentials. Start with logging in to the Exchange Admin Center using the credentials.

- Go to Admin Centers and click on the Security and Compliance option from the list.

- Go to Permissions and hit eDiscovery Manager.

Note: Make sure to be a member of the eDiscovery Manager Role Group to ensure access to several other functionalities.
- You can change the respective roles accordingly. To do this, click on the Edit icon. Here, you can easily modify the previously assigned permissions and also add other roles required for the eDiscovery group.
- By default, you will find a few pre-assigned permissions such as Case Management, Compliance Search, Export, Hold, Preview, Review, and RMS Decrypt.
- However, in some cases, the Export role can be missing. If this is the case with you, then you can add the Export role by following the previous step.

- Go to More Resources and click on it to open all resources in a panel. Then navigate to the Microsoft Purview Compliance portal and click on it. Go to Content Search and the left side of the screen and click on New Search.

Note: Here if you are unable to find the Content Search option then you need to verify whether eDiscovery Permissions are assigned or not. If not then ensure all the right permissions are assigned. It can take up to 24 hours to reflect the changes.
- When you click on New Search, it opens a wizard with different tabs. It allows you to customize all elements of the Content Search tabs. such as Name, Description, Location of user mailbox, etc.

Note: While choosing the Location, you can select the Exchange Server mailbox, Teams, and SharePoint sites too. Moreover, you should also note that selecting all the locations including SharePoint Online and Public Folders database can delay the eDiscovery process of exporting PST files from the Office 365 account.
- Moving to the Condition tab, you get options to set several filters such as query language/region, keywords/phrases, and conditions, including those related to time, message fields & properties, etc., These filters allow you a selective PST export.

Note: If you want to export the complete data of user mailboxes, then it is suggested not to apply any conditions, filters, or keywords.
- After applying all the desired filters and customization, click on the Submit button. Now, click on the Done button to start eDiscovery immediately.
- Now the eDiscovery search has started and it will run in the background. You can check the progress by clicking on the Search tab.

- Here you can check the the status of eDiscovery Search whether it is in-process or complete. Once, it gets completed then click on the Action button and choose Export Results.

- In this window, you can see various setting options for customization of your search export like; if you need to export encrypted files then include this option. Moreover, you can also customize the entire exported results before downloading it. If you do not need any filtration then you can leave these as it is or with default settings.

Note: Make sure not to set Enable Deduplication option, if you need to Export the search results in a single PST file.
- Hit Export it will start instantly. The go to Export tab select your search and track the status of this process.

- After successful completion of the process, click on the Close button.
- Once, the process is complete, hit the Download Results button. Also, make sure to copy the unique Export Key. You need to use this key in the ClickOnce extension when it will pop up the Export Tool.

- Now a pop-up will come and it will start the eDiscovery PST Export Tool. Now paste the copied Export Key and Define the destination path where the exported PST files will be saved. Lastly hit the Start to Export mailboxes data to PST files.

Limitations
- Due to its lengthy steps, naive users fail to adopt this method.
- Takes more time, as all the steps need to be performed by the user.
- This method does not allow a selective export option for the data items.
- Must be technically strong to export PST files from Office 365 account.
Solution 2: Export Mailbox from Exchange Server to PST Via PowerShell Method
- Step 1: Establish Connection using MS Exchange Server using PowerShell
- Step 2: Grant Access Right to Mailbox to Export Via PowerShell
- Step 3: Open MS Outlook for a New Account
- Step 4: Check Configuration Settings
- Step 5: Export Mailbox to PST via Import/Export Wizard
- Step 6: Ensure that Export Process is Completed
- Step 7: When Office 365 Export Process Completes
- Step 8: Exit PowerShell Session
Step 1: Establish Connection using MS Exchange Server using Powershell
- To begin the process of export PST from Office 365, run the below command in PowerShell,
“$UserCredential = Get-Credential”
In this, enter the credentials of Office 365 account, including username and password, which is mentioned under the Windows PowerShell Credential Request wizard
- Now, run the below-mentioned command
“$Session = New-PSSession -ConfigurationName Microsoft.Exchange -ConnectionUri https://outlook.office365.com/powershell-liveid/ -Credential $UserCredential -Authentication Basic –AllowRedirection”
- After that, run the following command,
“Import-PSSession $Session”
Step 2: Grant Access Right to Mailbox to Export Via PowerShell
This example will provide techsupport@teamsystools.com full access to freshtechsupport@teamsystools.com mailbox:
“Add-MailboxPermission – User freshtechsupport@teamsystools.com -Identity techsupport@teamsystools.com -AccessRights FullAccess -InheritanceType All”.
Step 3: Open MS Outlook for a New Account
Now, you need to open Outlook as freshtechsupport@teamsystools.com and ensure that techsupport@teamsystools.com is available in the mailbox in the left pane. Sometimes, the permission takes seconds or even minutes to get applied.
Step 4: Check Configuration Settings
Now, check whether Outlook is ready to be configured to download all the emails within the limited time.
- Click the File menu and select the Info page >> Account Settings.
- Then, click Account Settings again and select the account.
- Click the change button and ensure that the Use Cached Exchange Mode option is enabled.
Step 5: Export Mailbox to PST via Import/Export Wizard
- Launch the Import/Export wizard to export techsupport@teamsystools.com to PST file. For that, click File menu>> Open & Export >> Import/ Export option.
- Select Export to a file from the given list of options and click Next.
- After that, select Outlook Data file (.pst) option and click Next.
- Select techsupport@teamsystools.com from the given list and click Next. Ensure that Include Subfolders checkbox is enabled.
- Mention a new name to the file and a storage location to store the PST file, i.e., c:\tmp\outlook-archive- techsupport@teamsystools.com -20160209.pst.
- From the Option section, select either Do not export duplicate items or Replace duplicates with items exported option and click Finish to export mailbox from Office 365 to PST.
- Now, enter the password for the PST file if required else leave it blank if the policy allows to do it and click OK.
- MS Outlook will remain inoperative until the export is under process. Thus, wait until it gives control to access the file.
Step 6: Ensure that Export Process is Completed
To verify that the Office 365 mailbox export to PST, process is completed, check the mailbox size on the Server and compare it with the exported PST file size. To do the same, follow the steps below,
- Firstly, right-click on the mailbox from the right pane and select Data File Properties options.
- Go to the General tab and click on the Folder size button.
- Now, select Server Data tab and note the value mentioned as Total size.
- Finally, check the properties of the exported PST file. Ensure that the size of this file is comparable to the Total Size value, which is mentioned by Outlook.
Step 7: When Office 365 Export Process Completes
After you successfully export Office 365 mailbox to PST, you have to remove all the permissions which were granted initially through PowerShell. Run the below command to do the same,
“Remove-MailboxPermission -User freshtechsupport@teamsystools.com -Identity techsupport@teamsystools.com -AccessRights FullAccess”
Step 8: Exit PowerShell Session
Finally, the PowerShell session needs to be closed down after the permissions are removed. Follow the below command to execute the same,
“Remove-PSSession $Session”
Also Read: How to Enable Office 365 Message Encryption
Solution 3: Try the Alternate Method to Export Mailbox from Office 365 to PST
A user can export PST from Office 365 account effectively by using the manual methods which are clearly mentioned above. Though the manual method is cost-free, it does not provide a complete solution to export Office 365 mailbox to PST file. Some of the consequences associated with the manual methods include data loss, file corruption. Inconsistency in the exported PST file, etc. To resolve all these drawbacks, it is recommended to use SysTools Office 365 Export Tool.
This tool is enriched with multiple features which provide an easy interface to all its users. It allows exporting Office 365 mailboxes into multiple file formats such as PST, EML, and MSG. All the data items are extracted, which include emails, contacts, calendar, etc. It provides a two-mode export option, i.e., Export O365 archive mailboxes or in-place archive mail. It provides a unique feature, i.e., Login for Admin option, which allows users to connect with different Exchange Online accounts.
Detailed Steps to Export Office 365 Mailbox Emails to PST File Format:
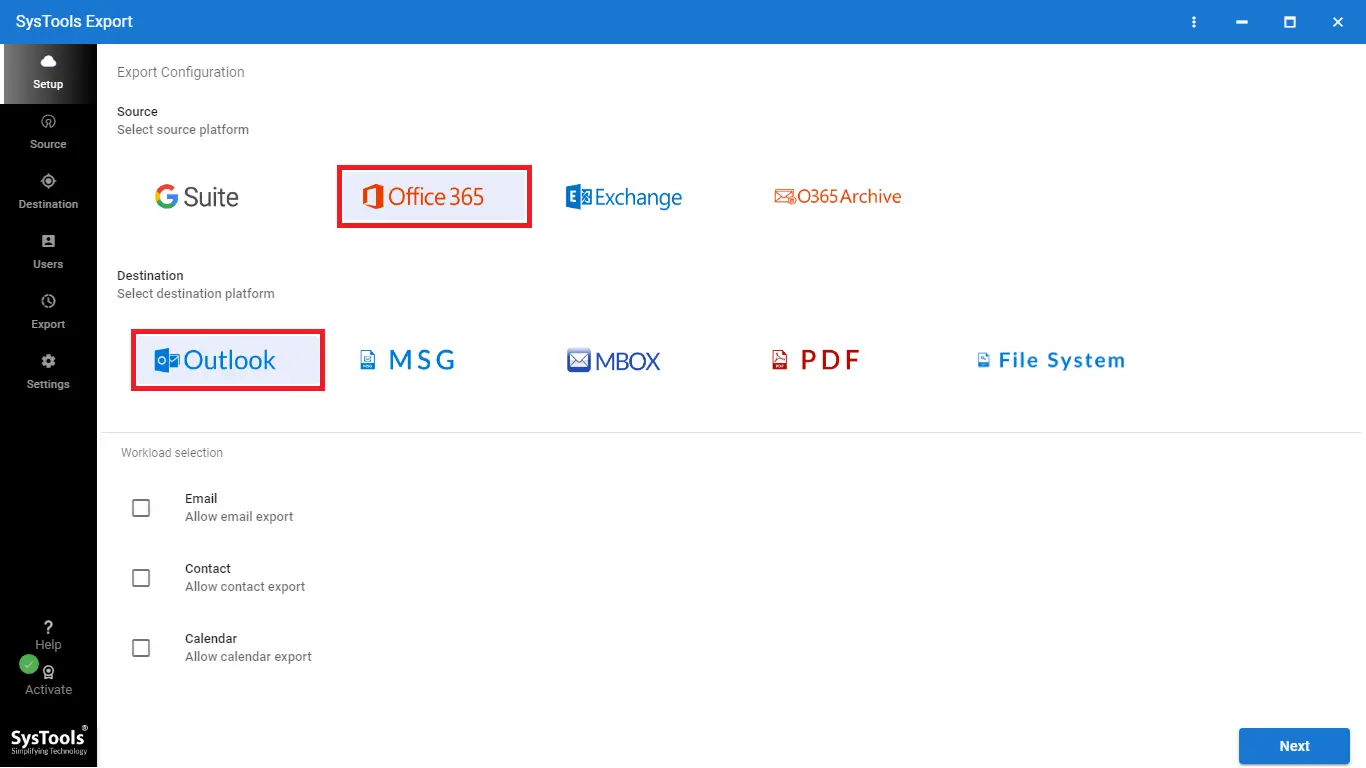
- Install & run the above tool on your PC. From the main screen, select Office 365 as the source platform and PST as the destination platform.
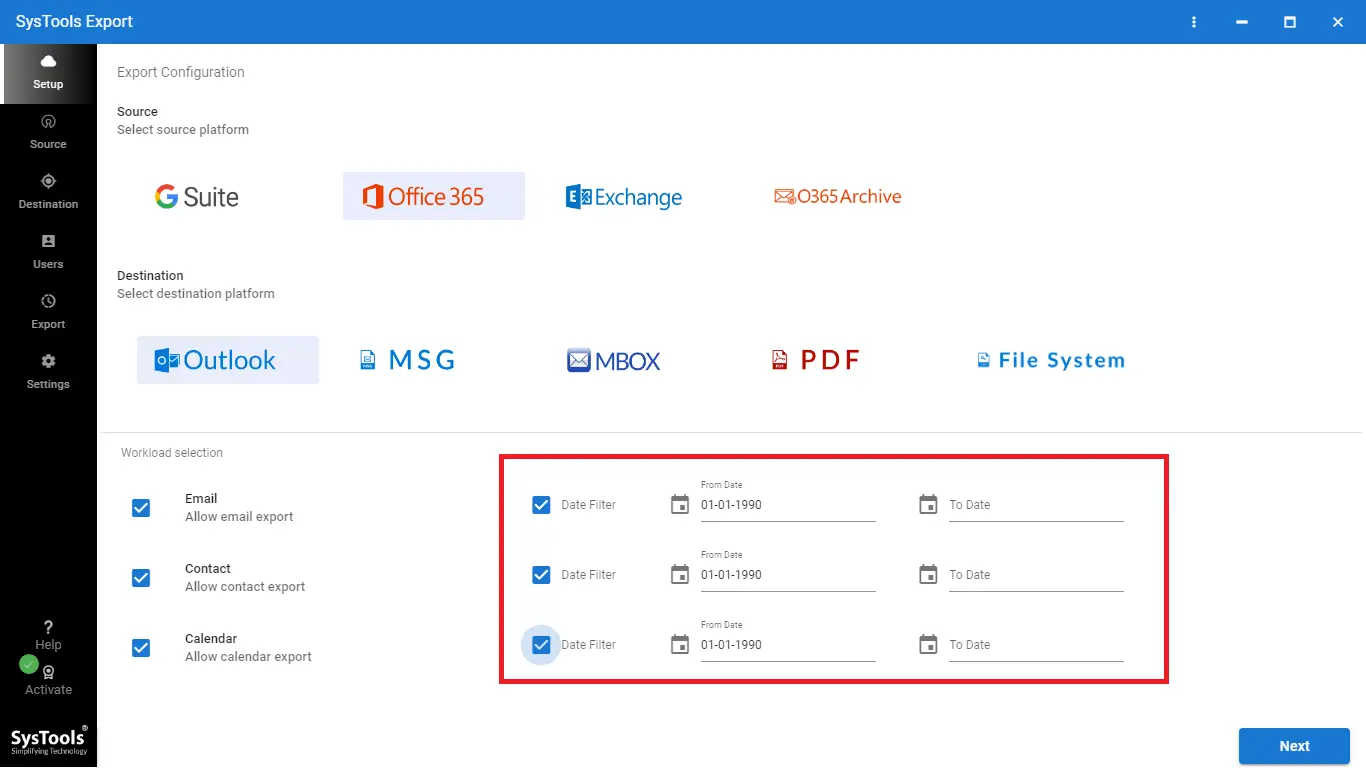
- From workload selection, enable required Mailbox items to export, such as emails, contacts, and calendars. If you want to export data for a specific date range, apply the Date Filter.
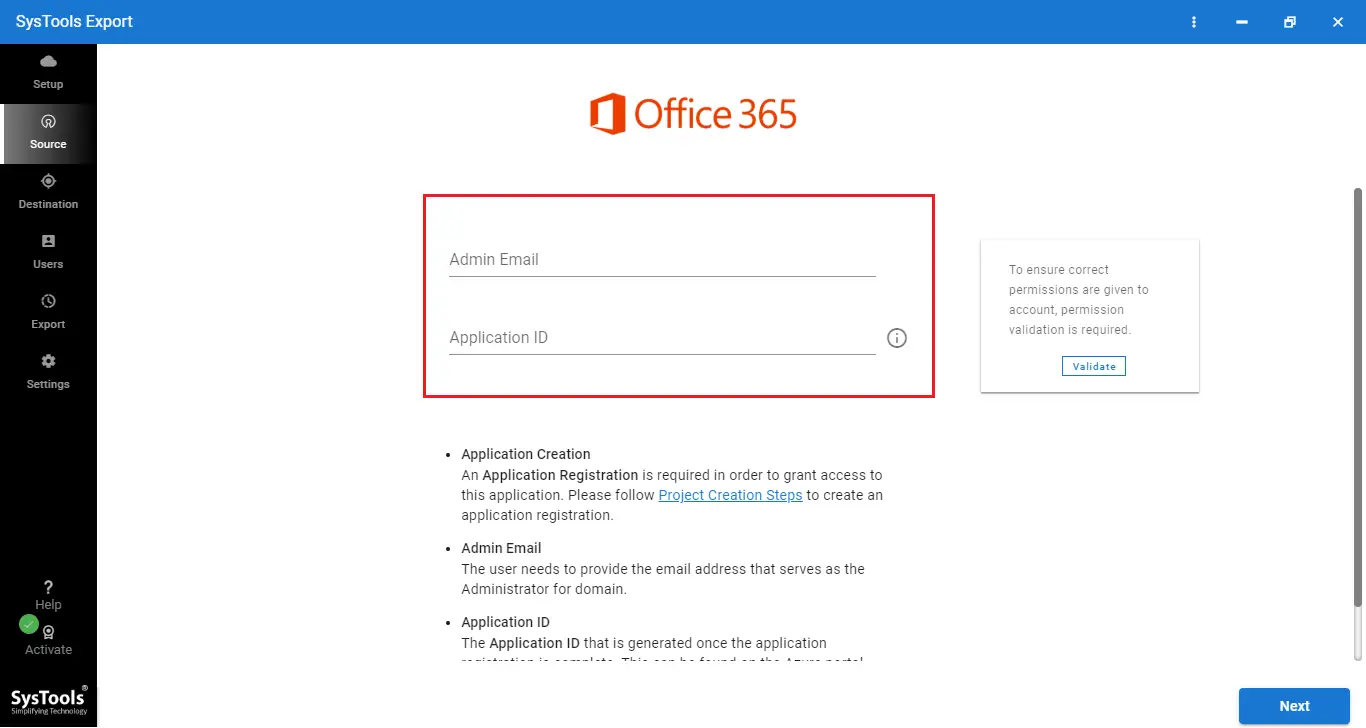
- Use the Office 365 admin account credentials to log in and validate the required permissions.
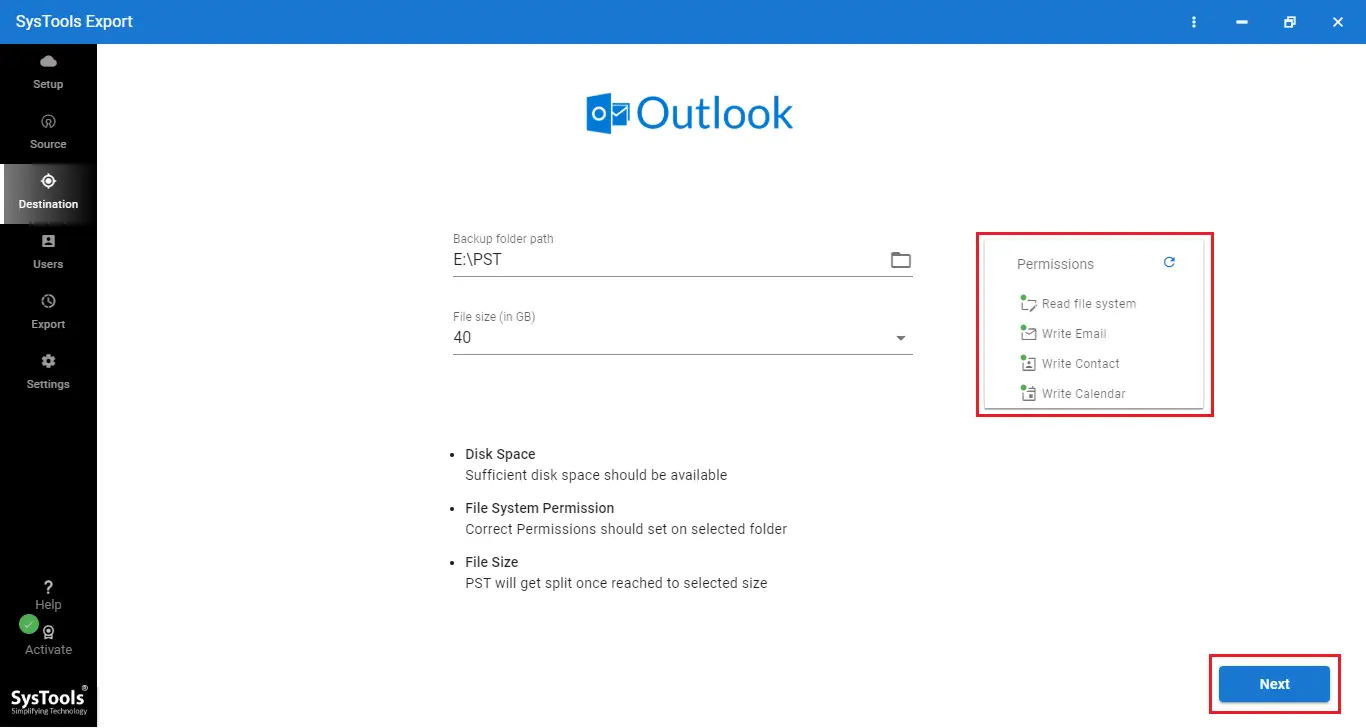
- Set the destination path to save the resultant PST files on your computer. Choose the appropriate PST file size.
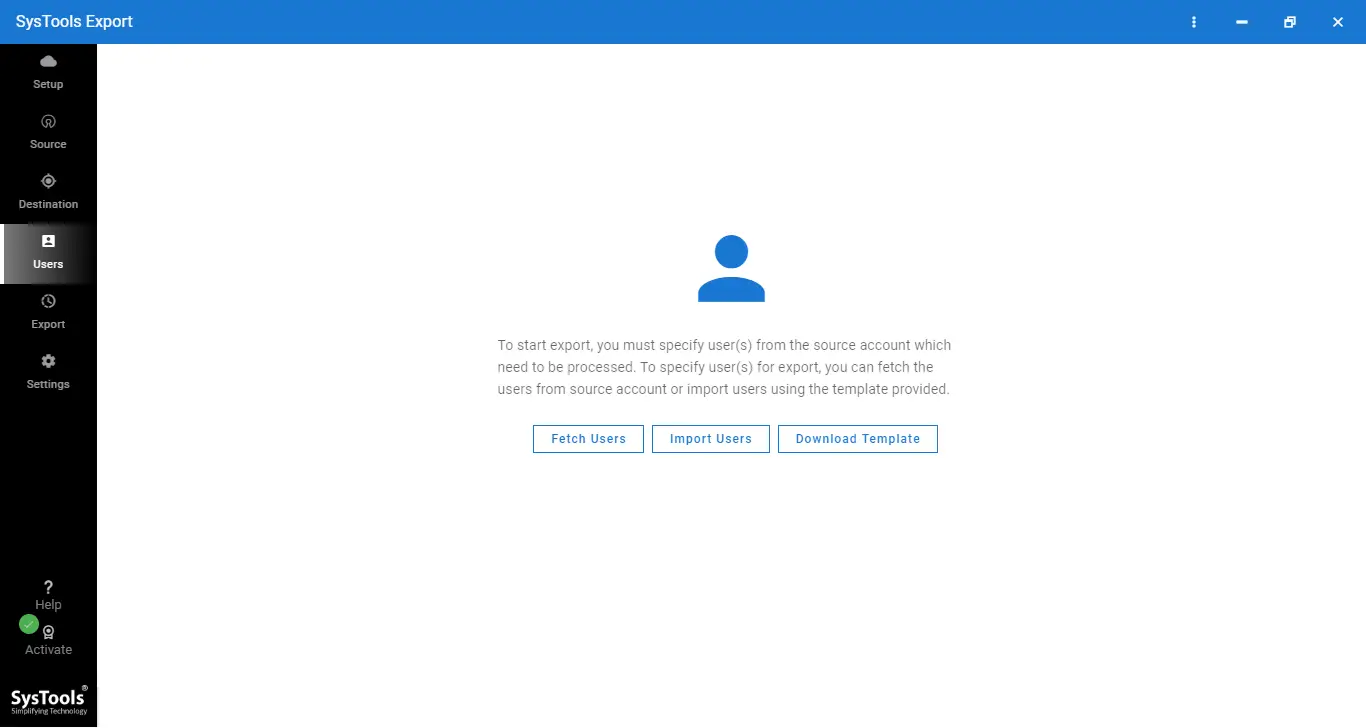
- Add users using any of the following methods:
- Fetch Users: Automatically fetch users from the Source domain.
- Import Users: Import users through a CSV file.
- Download Template: Get a sample CSV template to create your user list.
- Select the users whose data you want to export and click “Start Export Process.”
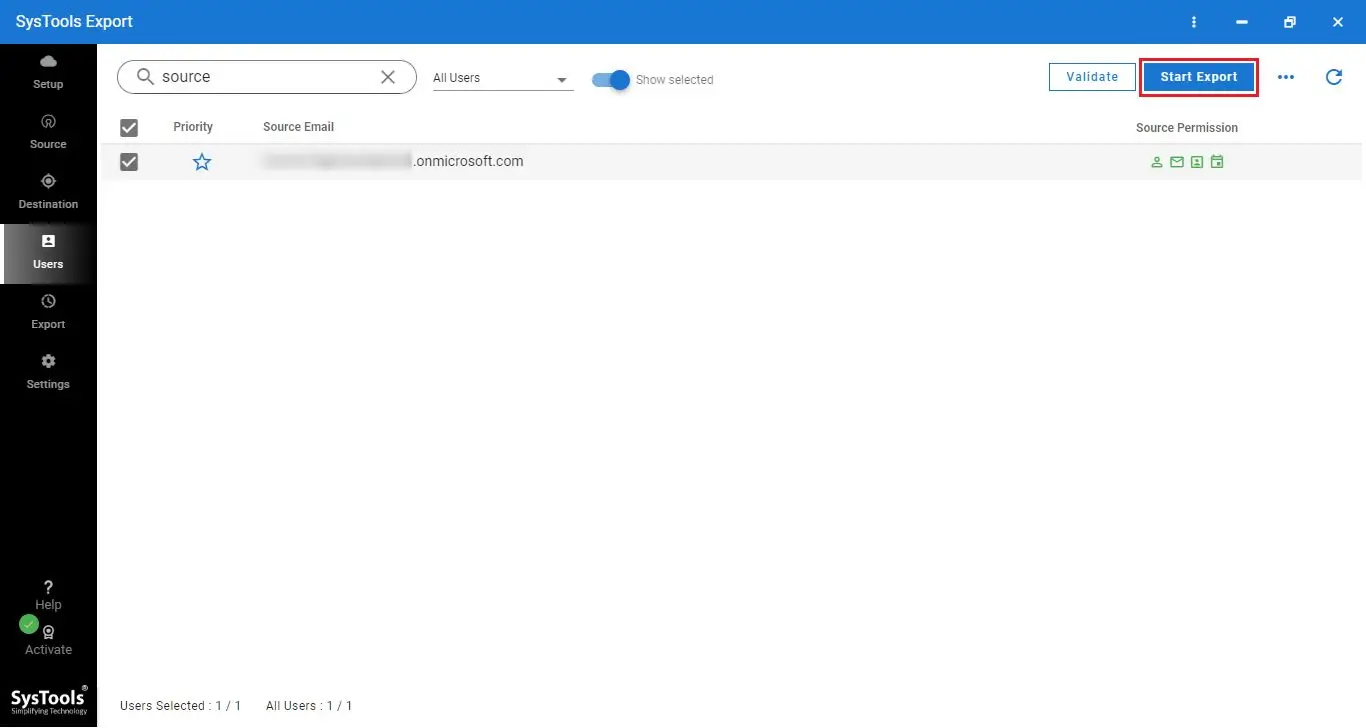
That's it! All it requires are the above few steps to export emails from multiple Office 365 accounts into a PST file format. No requirement to go through the hassle to understand the big technical functions of ediscovery or PowerShell commands. Moreover, no requirements for project creation whatsoever; simply export all mailboxes from the Office 365 user account to PST format in a few clicks.
Also Read: How to Upload PST to Office 365 without Outlook?
Comparison Of Different Methods for Exporting Office 365 Mailbox to PST
| Methods | Pros | Cons |
|---|---|---|
| eDiscovery |
|
|
| PowerShell |
|
|
| Third-Party Tool |
|
|
Conclusion
One can easily export mailbox from Office 365 to PST either by using manual method or automated method. Though the manual method is cost-free, it offers limited features, which are not very reliable. Also, using the manual method can lead to various drawbacks, which are mentioned above. Hence, it is advised to download and install the third-party tool. It is a professional tool which is highly in demand in the market. It is an effective tool to export Office 365 mailboxes to PST and 2 other file formats. Moreover, this tool is also compatible with the latest version of Windows OS, including Windows 10.